import subprocess
import hmac
import hashlib
import base64
from sanic.response import text
from sanic import Blueprint
from git import Repo

# 路由蓝图
hook_blue = Blueprint('hook_blue')


@hook_blue.route('/hook/kaifa', methods=["POST"])
async def kaifa(request):
    timestamp = request.headers.get('X-Gitee-Timestamp')
    # 秘钥
    secret = '**********'
    secret_enc = bytes(secret.encode('utf-8'))
    # 把 timestamp+"\n"+密钥 当做签名字符串 string_to_sign
    string_to_sign = '{}\n{}'.format(timestamp, secret)
    string_to_sign_enc = bytes(string_to_sign.encode('utf-8'))
    # 使用HmacSHA256算法计算签名,得到 hmac_code
    hmac_code = hmac.new(secret_enc, string_to_sign_enc,digestmod=hashlib.sha256).digest()
    # 将hmac_code进行Base64 encode
    my_sign = base64.b64encode(hmac_code).decode('utf-8')

    gitee_sign = request.json.get('sign')
    if my_sign == gitee_sign:
        gitrepo = Repo("/www/wwwroot/********/")
        remote = gitrepo.remote()
        info = remote.pull()
        return text(str(info))
    else:
        return text('签名错误')


@hook_blue.route('/hook/ceshi', methods=["POST"])
async def ceshi(request):
    timestamp = request.headers.get('X-Gitee-Timestamp')
    # 秘钥
    secret = '*******'
    secret_enc = bytes(secret.encode('utf-8'))
    # 把 timestamp+"\n"+密钥 当做签名字符串 string_to_sign
    string_to_sign = '{}\n{}'.format(timestamp, secret)
    string_to_sign_enc = bytes(string_to_sign.encode('utf-8'))
    # 使用HmacSHA256算法计算签名,得到 hmac_code
    hmac_code = hmac.new(secret_enc, string_to_sign_enc,digestmod=hashlib.sha256).digest()
    # 将hmac_code进行Base64 encode
    my_sign = base64.b64encode(hmac_code).decode('utf-8')

    gitee_sign = request.json.get('sign')
    if my_sign == gitee_sign:
        # 执行的命令
        cmd = r'git pull'
        # cwd指的是某个进程运行时所在的目录;cwd是“current working directory”的缩写
        cwd_path = r'/www/wwwroot/********/'
        process = subprocess.Popen(cmd, shell=True, cwd=cwd_path, stderr=subprocess.PIPE, stdin=subprocess.PIPE,
                                   stdout=subprocess.PIPE)
        process.wait()
        result = process.returncode
        if result == 0:
            return text("git 的拉取:成功")
        else:
            return text("git 的拉取:失败")
    else:
        return text('签名错误')
/******************************************************************/
conda后台运行python脚本shell脚本run.sh:
想以www用户运行脚本,记的切换到www用户,再启动脚本,
./run.sh start
#!/bin/bash
#应用入口文件
APP_NAME=/www/wwwroot/python-webhook/main.py
#进程关键字
PROCESS_KEYWORD=python-webhook
#使用说明,用来提示输入参数
usage(){
echo "Usage: sh run.sh [start|stop|restart|status]"
}
#检查程序是否在运行
is_exist(){
pid=`ps -ef|grep $PROCESS_KEYWORD|grep -v grep|awk '{print $2}'`
if [ -z "${pid}" ];then
return 1
else
return 0
fi
}
#启动方法
start(){
is_exist
if [ $? -eq 0 ];then
echo "${APP_NAME} is already running. pid=${pid}"
else
conda run --name python-webhook nohup python ${APP_NAME} >nohup.out 2>&1 &
fi
}
#停止方法
stop(){
is_exist
if [ $? -eq "0" ]; then
ps -ef|grep $PROCESS_KEYWORD|grep -v grep|awk '{print $2}'|xargs kill -9
else
echo "${APP_NAME} is not running"
fi
}
#输出运行状态
status(){
is_exist
if [ $? -eq "0" ]; then
echo "${APP_NAME} is running. Pid is ${pid}"
else
echo "${APP_NAME} is NOT running."
fi
}
#重启方法
restart(){
stop
sleep 5
start
}
#根据输入参数,选择执行对应方法,不输入则执行使用说明
case "$1" in
"start")
start
;;
"stop")
stop
;;
"status")
status
;;
"restart")
restart
;;
*)
usage
;;
esac
/*****************************************************************/
需要以哪个用户来运行python代码,就切换到哪个用户下进行安装:
1. 使用grep www /etc/passwd查看用户权限
$ grep www /etc/passwd
www:x:1001:1001::/home/www:/sbin/nologin
可以看出,www是/sbin/nologin禁止登录的。只要修改这个模式就可以了
2. 修改模式
$ usermod -s /bin/bash www
3. 再次查看状态
$ grep www /etc/passwd
www:x:997:995:www user:/var/cache/www:/bin/bash
4. 然后就可以用su - www切换了
$ su - www
1
5. 恢复的话改为/sbin/nologin即可
$ usermod -s /sbin/nologin www
开始安装:
https://docs.conda.io/en/latest/miniconda.html
Free Download | Anaconda
Centos7.9安装miniconda
Miniconda是一个 免费的 轻量级的 conda安装程序
conda是一个开源的包、环境管理器,能在同一个机器上安装不同Python版本的软件包及其依赖,以及在不同Python环境之间切换
Miniconda只包含conda、Python、pip、zlib等基础的文件和依赖包
Anaconda不仅包含conda、Python等基础文件,还包含很多装好的包,如:numpy、pandas
使用conda install命令可从Anaconda存储库中安装额外的conda包
下载Miniconda3-latest-Linux-x86_64.sh
wget https://mirrors.tuna.tsinghua.edu.cn/anaconda/miniconda/Miniconda3-latest-Linux-x86_64.sh
运行.sh
sudo sh Miniconda3-latest-Linux-x86_64.sh
输入安装的路径,如/usr/anconda3
添加/usr/anconda3到系统环境变量文件/etc/profile文件
sudo vi /etc/profile
添加
export PATH=/usr/anconda3/bin:$PATH
激活生效,或重启
source /etc/profile
检测安装是否成功
conda -V
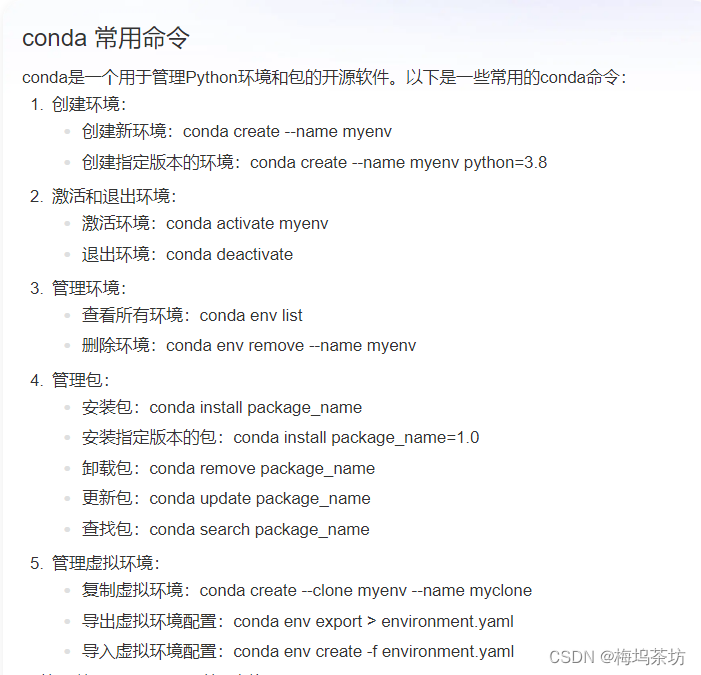
2、配置conda镜像源
conda config --add channels https://mirrors.tuna.tsinghua.edu.cn/anaconda/pkgs/free/
conda config --add channels https://mirrors.tuna.tsinghua.edu.cn/anaconda/pkgs/main/
conda config --add channels http://mirrors.tuna.tsinghua.edu.cn/anaconda/cloud/conda-forge/
conda config --add channels http://mirrors.tuna.tsinghua.edu.cn/anaconda/cloud/pytorch/
# optional
conda config --add channels http://mirrors.tuna.tsinghua.edu.cn/anaconda/cloud/msys2/
conda config --set show_channel_urls yes
/****************************************/
要卸载 Miniconda,请按照以下步骤进行操作:
打开终端或命令提示符窗口,确保以管理员权限运行。
根据你的操作系统,执行以下命令卸载 Miniconda:
在 Windows 上:
conda install anaconda-clean
anaconda-clean --yes
在 macOS 或 Linux 上:
conda install anaconda-clean
anaconda-clean --yes
在某些 Linux 发行版中,可能需要在命令前加上 sudo。
确认卸载操作。执行上述命令后,你将被要求确认卸载。请仔细阅读提示信息,然后输入 y 或 yes 确认卸载。
删除 Miniconda 安装目录:在终端中执行以下命令,将 <miniconda_install_dir> 替换为你的 Miniconda 安装目录:
rm -rf <miniconda_install_dir>
注意:请谨慎执行此命令,确保你删除的是正确的安装目录。
检查环境变量:卸载 Miniconda 后,你可能还需要手动删除与 Miniconda 相关的环境变量。在 Windows 上,可以通过 “控制面板” -> “系统和安全” -> “系统” -> “高级系统设置” -> “环境变量” 打开环境变量设置界面,然后检查并删除相关的环境变量。在 macOS 或 Linux 上,可以编辑 ~/.bashrc 或 ~/.bash_profile 文件,并删除相关的路径配置。
完成上述步骤后,你的系统应该已成功卸载 Miniconda。请确保在卸载之前备份你的数据,以防万一。
/**************************************************/
创建虚拟环境:
conda create -n python-webhook python=3.11
后台运行python脚本:
conda run --name python311-venv nohup python main.py >nohup.out 2>&1 &
/*************************************************************/
conda可以配合其他python包管理工具一起使用,比如pipenv或者poetry,
conda安装好某个python版本的虚拟环境后,就在这个虚拟环境运行其他包管理工具即可,
比如poetry包管理的项目,虚拟环境安装好poetry工具后,运行poetry install即可安装好项目需要的依赖包,然后启动项目即可