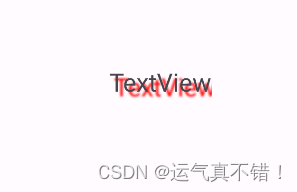
TextView
实现阴影效果的textview
android:shadowColor="#ffff0000"设置阴影颜色为红色android:shadowRadius="3"设置阴影的模糊程度为3android:shadowDx="10"设置阴影在水平方向的偏移android:shadowDy="10"设置阴影在竖直方向的偏移
实现跑马灯效果的textviewandroid:singleLine="true"内容单行显示android:ellipsize="marquee"在文本过长而无法完全显示时,让文本滚动显示android:marqueeRepeatLimit="marquee_forever"设置文本的重复次数android:focusable="true"设置TextView是否可以接收焦点android:focusableInTouchMode="true"设置TextView在触摸模式下是否可以接收焦点android:clickable="true"设置TextView是否可以被点击(设置后点击文本开始滚动,如果想要实现进入应用自动滚动可以继承textview重写isFocused方法,并把控件部分更改为自定义控件,如com.example.myapplication.myTextView)
ProgressBar
style="?android:attr/progressBarStyleHorizontal"水平进度条android:max="100"进度条最大值android:indeterminate="true"如果设置为true,则进度条不精确显示进度android:progress进度条已完成进度值
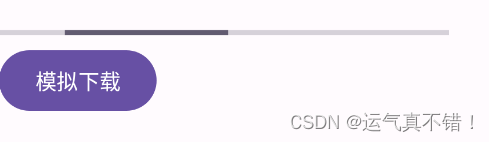
activity中设置点击一次进度值+10
  fun loadOnclick(view: View) {
        var progress = loadprogressBar.progress
        progress+=10
        loadprogressBar.progress = progress
    }
Notification对话框
setContentTitle("软件通知")主题setContentText("notification练习")内容setSmallIcon(R.drawable. )小图标setLargeIcon(BitmapFactory.decodeResource(resources, R.drawable. ))大图标- setColor(Color.parseColor(“#ff0000”))小图标颜色
setContentIntent(pendingIntent)点击通知跳转的页面setAutoCancel(true)点击通知后是否自动清除
代码:
override fun onCreate(savedInstanceState: Bundle?) {
        super.onCreate(savedInstanceState)
        setContentView(R.layout.activity_main)
  //获取NotificationManager对象(通知管理类)
        manager = getSystemService(NOTIFICATION_SERVICE) as NotificationManager


        if (Build.VERSION.SDK_INT >= Build.VERSION_CODES.O) {
            //创建NotificationChannel
            var channel = NotificationChannel(
                "MainActivity", "测试",
                //通知重要程度设置
                NotificationManager.IMPORTANCE_HIGH//开启通知,会弹出,发出提示音,状态栏中显示
            )

            manager.createNotificationChannel(channel)
        }

        var intent = Intent(this, MainActivity2::class.java)
        //将Intent转换成pendingIntent
        var pendingIntent = PendingIntent.getActivity(this, 0, intent, PendingIntent.FLAG_MUTABLE)

        //Notification对象,设置通知内容和格式
        //channelid渠道id
        notification = NotificationCompat.Builder(this, "MainActivity")
            .setContentTitle("软件通知")//主题
            .setContentText("notification练习")//内容
            .setSmallIcon(R.drawable.baseline_campaign_24) //小图标
            .setLargeIcon(BitmapFactory.decodeResource(resources, R.drawable.img))//大图标
            .setColor(Color.parseColor("#ff0000"))//小图标颜色
            .setContentIntent(pendingIntent)//点击通知跳转的页面
            .setAutoCancel(true)//点击通知后是否自动清除
            .build()
    }


 fun sendOnClick(view: View) {
        //发出通知
        manager.notify(1, notification)
    }

    fun cacelOnClick(view: View) {
        //取消通知
        manager.cancel(1)
    }
Toolbar
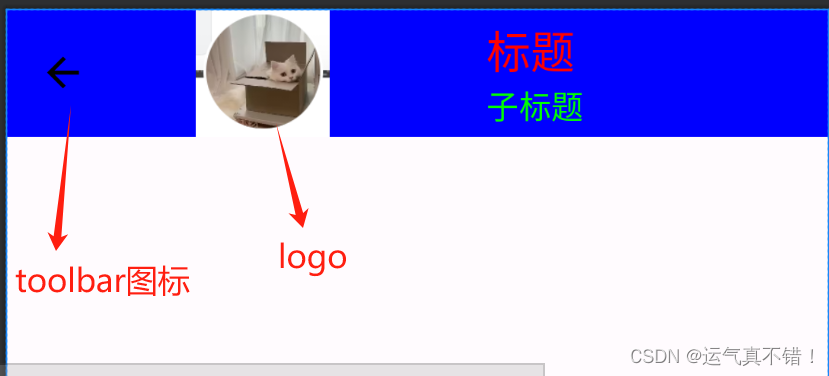
android:layout_width="match_parent"toolbar的宽度android:layout_height="?attr/actionBarSize"toolbar的高度android:background="#0000ff"toolbar的背景颜色设置app:navigationIcon="@drawable/baseline_arrow_back_24"toolbar的图标app:title="标题"toolbar的主标题app:titleTextColor="#ff0000"toolbar的主标题颜色app:titleMarginStart="40dp"toolbar的主标题距离左边的边距app:subtitle="子标题"toolbar的子标题app:subtitleTextColor="#00ff00"toolbar的子标题颜色app:logo="@drawable/img"toolbar的logo
Toolbar点击事件
    toolbar = findViewById(R.id.toolbar)
        toolbar.setNavigationOnClickListener(View.OnClickListener {
            Toast.makeText(this, "toolbar被点击了", Toast.LENGTH_SHORT).show()
        })
AlertDialog
var builder = AlertDialog.Builder(this)构建对话框参数builder.setIcon(R.drawable.img)添加图标builder.setTitle("对话框")添加对话框标题builder.setMessage("今天过的开心吗")添加对话框消息内容builder.setView(R.layout.dialog)添加对话框自定义布局- 设置确定按钮,我修改成我需要的了
builder.setPositiveButton("是的",DialogInterface.OnClickListener { dialogInterface, i ->
                Toast.makeText(this, "是的", Toast.LENGTH_SHORT).show()
            })
- 设置取消按钮,我修改成我需要的了
builder.setNegativeButton("不是",DialogInterface.OnClickListener { dialogInterface, i ->
                Toast.makeText(this, "不是", Toast.LENGTH_SHORT).show()
            })
- 设置中间按钮,我修改成我需要的了
builder.setNeutralButton("不好也不坏",DialogInterface.OnClickListener { dialogInterface, i ->
                Toast.makeText(this, "不好也不坏", Toast.LENGTH_SHORT).show()
            })

PopupWindow
创建一个PopupWindow对象。
popupView是这个弹出窗口的内容视图。
ViewGroup.LayoutParams.WRAP_CONTENT表示弹出窗口的宽度和高度都是根据其内容自动调整的。
true表示当点击弹出窗口以外的空白区域时,弹出窗口会被关闭
var popupWindow = PopupWindow(
            popupView,
            ViewGroup.LayoutParams.WRAP_CONTENT,
            ViewGroup.LayoutParams.WRAP_CONTENT,
            true//点空白处退出弹窗
        )
setContentView(View contentView)设置popupwindow显示的viewpopupWindow.showAsDropDown(view)相对某个控件的位置(正左下方)无偏移showAsDropDown(View anchor, int xoff, int yoff)相对某个控件的位置,有偏移popupWindow.setBackgroundDrawable(getDrawable(R.drawable.img))设置背景setFocusable(boolean focusable)设置是否获取焦点(点空白处退出弹窗)popupWindow.dismiss()关闭弹窗setAnimationStyle(int animationStyle)设置加载动画setTouchable(boolean touchable)设置弹窗内部触摸使能(处理触摸事件)setOutsideTouchable(boolean touchable)设置弹窗外部触摸使能(处理触摸事件)
全部代码
 fun popupOnClick(view: View) {
        var popupView = layoutInflater.inflate(R.layout.popupview, null)
        var btn1 =popupView.findViewById<Button>(R.id.button)
        var btn2 =popupView.findViewById<Button>(R.id.button2)
        var popupWindow = PopupWindow(
            popupView,
            ViewGroup.LayoutParams.WRAP_CONTENT,
            ViewGroup.LayoutParams.WRAP_CONTENT,
            true//点空白处退出弹窗
        )

        popupWindow.setBackgroundDrawable(getDrawable(R.drawable.img))

        popupWindow.showAsDropDown(view)//显示在按钮下方

		//弹窗中按钮点击事件
        btn1.setOnClickListener(View.OnClickListener {
            Toast.makeText(this, "点击了是的按钮", Toast.LENGTH_SHORT).show()
        })

        btn2.setOnClickListener(View.OnClickListener {
            Toast.makeText(this, "点击了不是按钮", Toast.LENGTH_SHORT).show()
            popupWindow.dismiss()//关闭弹窗
        })
    }